Blog about pictures, videos, multimedia, and all sorts of media related information.
See Also:
PowerPoint and Presenting Stuff
Technology Made Easy
That’s a good question. Turns out that you can do quite a bit with the free account, but the Premium account does provide more options — after all members who pay should get something extra to justify their subscription costs!
By signing up as a free member, you are limited by some options:
For anything that’s put up in italics in the list above, be assured that they will be explained in a later post.
So what do you do if you don’t want to live with the limitations? Simple — you either sign up as a Premium member, or upgrade your free account to the Premium level. Having said that, many newcomers to Webshots can continue their free accounts, and upgrade later whenever they start making more use of the site.
For the next few posts, we’ll only explore the free accounts although everything explained in these posts will certainly work for Premium members as well.
Filed Under:
W
Tagged as: Free account, Pictur, Premium account, Share, Webshots
Comments Off on What can you do with a free Webshots account?
Becoming a member on Webshots is easy — you just provide some simple details like your name, location, and email address — then after a quick verification process achieved through email, you become a member. Once you are a member, you can use any of the free options, or opt to become a Premium member by paying a subscription charge. Throughgout this series of tutorials, we will explore both the Free and Premium accounts of Webshots — but for now, let me show you how you can become a free member to start with:
In the next blog post, we’ll explore what the free account allows you to do, and we’ll also briefly look at the Premium account.
Comments Off on Joining WebShots as a Free Member
Webshots is a photo sharing and storing site from CNET that allows you to do more with your visual content than what would have been possible by just storing them on your computer. In many ways, it is like other photo sharing sites like Flickr, MSN Photos, Kodak Gallery — yet it does have some features that set it apart from these other sites.
At the most basic level, Webshots is a simple area on the Internet where you can store and share pictures. Webshots also provides a desktop application that you can download from their site — this application lets you change your desktop wallpaper at regular intervals.
In future blog posts, we will show you how you can use all the Webshots features to your advantage.
Comments Off on What is Webshots?
In the last post, I explained what Flickr sets are — and now I’ll explain to you what you can do with tags in Flickr.
Tags are like associated keywords for any picture — thus for a vaction picture from Japan of Mount Fuji, you could use these tags:
japan
vacation
mount fuji
snow
The next time, you are searching for that particular picture in the 21,894 pictures you have uploaded to Flickr — all you need to do then is use these tags as search terms — and you’ll find the picture you are searching for!
Not only can you search for tags that you have provided to your photos, you can also search for tags that other Flickr users have applied to their uploaded photos.
Adding Tags
Most of the time, all sorts of uploading options allow you to apply tags when you are uploading your photos to Flickr. But there might be times when you want to add tags to photos already in your Flickr account. To do that, follow these steps:
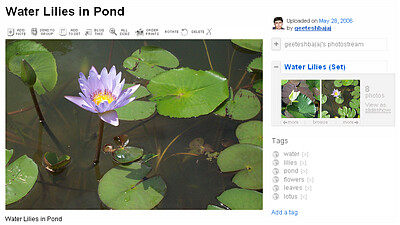
If you want to choose from tags you have already applied to existing, uploaded photos, click the Choose from your tags option that you can see in Figure 2 above.
In upcoming posts, I’ll teach you how you can add the same tags to all photos in a set. If you don’t know what Flickr sets are, look at this previous post…
See Also: Flickr Tutorial Series
Comments Off on What are Flickr Tags?
Before I discuss more about uploading and sharing photos on Flickr, there are two things that each Flickr user should know. These are sets and tags. I’m explaining sets in this post, and will teach you more about tags in another post.
Sets are a way to group your photos so that they are easy to organize and identify. Figure 1 shows a few sets in my Flickr account.
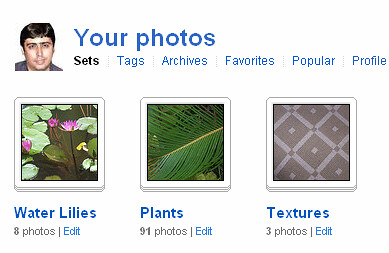
Figure 1: A few of my Flickr sets
Think of sets as folders in your computer–you might have a different folder for your business correspondence, another for your spreadsheets, and yet another for presentations. Even then, sets are a little different than folders–let me explain this in a different way:
Why sets are like folders?
Why sets are not like folders?
Viewing Your Sets
To view your sets, follow these steps:
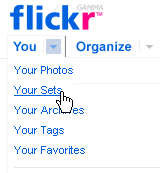
– To edit the sequence of photos in the set, or to add more uploaded photos to an existing set, click the Edit button to open the Flickr Organizer interface.
– Just double-click any set thumbnail to view the photos in that set.
In later posts, I’ll explain how you can organize and view photos on Flickr.
See Also: Flickr Tutorial Series
Comments Off on What are Flickr Sets?
Yes, that question has come up often since I used his Flickr account to create all the screenshots.
Scooby Gooseberry is an imaginary, fictitious character with a real Flickr account–I created that account for him so that we could use him as a case study to learn more about Flickr in a fun environment.
Flickr likes Scooby too. In fact, just today morning when Scooby wanted to upload some photos to his new account, Flickr asked him to come back later since it was massage time for Flickr (see Figure 1).

Figure 1: Flickr’s Massage Time
I’ll ask my staff at Indezine.com to create a caricature of Scooby one of these days–he’s such a lovable character!
See Also: Flickr Tutorial Series
Comments Off on Who is Scooby Gooseberry?
Before you ask people to see your photos on Flickr, spend a minute to create your own Flickr web address. A Flickr web address is an alias that you can specify for yourself so that it becomes part of the URL to your Flickr page.
For example, Scooby Gooseberry’s Flickr web address is:
http://www.flickr.com/photos/scoobygooseberry
Not only will it be easy for you to send an alias based Flickr web address to others, it will also be simpler for you to remember your address!
To create your own web address on Flickr, follow these steps:

If you don’t find this option on your welcome page (the Flickr home page after you have signed in), that might be because you have already created a Flickr web address.
As a last resort, try visiting this link while you are signed into Flickr:
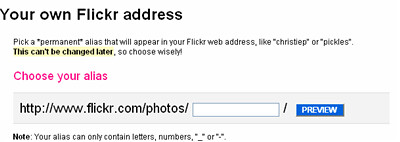
Your Flickr web address, as you can see in Figure 2 includes the alias you choose–the chosen alias gets suffixed to the “http://www.flickr.com/photos/” URL. Your alias cannot contain any spaces, and may contain alphabet letters, numbers, underscores, and hyphens–normally a combination of these works well too. Choose something easy–if that alias is already taken, Flickr asks you to choose something else.
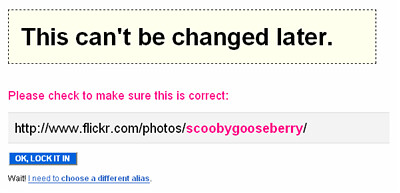
If you are happy with the alias, click the OK, Lock It In button–or alternatively, click the I need to choose a different alias hyperlink to start the process of choosing an alias again.
Here’s my Flick web address:
http://www.flickr.com/photos/geetesh/
See Also: Flickr Tutorial Series
Comments Off on Creating a Flickr Web Address
Now that you know what Flickr is, and how you become a Flickrmember–it’s time to learn how you can upload your first photo!
To cook up this task, make sure you have all the right ingredients:
And here’s how you put all those ingredients together:
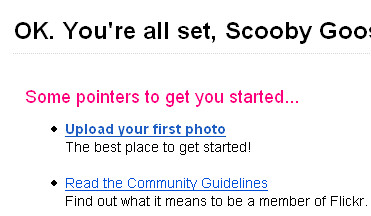
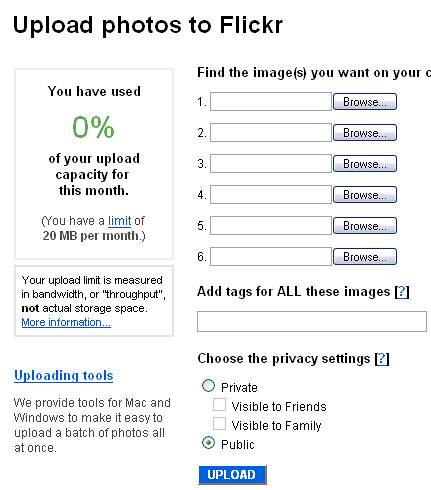
At this time, adding these tags might not be high on your list of priorities, but a few years from today–when your Flickr account has a gazillion photos you’ll appreciate that you tagged all your photo uploads since that will make those photos easier to search for you–and for others who are permitted to see your photos. So for now just add those tags–and separate those tags with commas.
Visible to Friends: These photos will only be visible to you and those contacts whom you identify as Friends.
Visible to Family: These photos will only be visible to you and those contacts whom you identify as Family.
Visible to Friends and Family: Just check both the options.
Public: This means anyone can see your photos–just anyone and they don’t even have to be Flickr members.
I normally just mark all my photos without any human faces as public, but you’ll want to decide what works for you. Whichever option you choose, these privacy settings can be changed for each uploaded photo anytime.

Unless you have a very slow internet connection, you can open another browser window and do something else until the photos are uploaded.
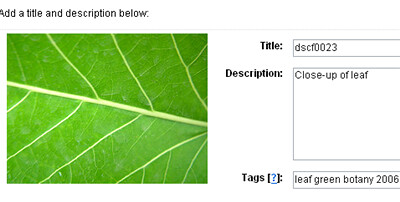
In upcoming posts, I’ll show you how you can drag a bunch or even an entire folder of photos to your Flickr account using the uploading tools available from Flickr.
And no I haven’t forgotten this–here’s a link to Scooby Gooseberry’s photos on Flickr…
See Also: Flickr Tutorial Series
Comments Off on Uploading Photos to Flickr–01
Although you can browse public photos at Flickr without becoming a member, there are many things you still cannot do a Flickr without becoming a member:
Obviously, the first thing you want to do is become a member.
In this post, I’ll explain the process to you about how you can become a free member. In a later post, I’ll discuss the advantages of upgrading to a Pro account. Remember that even if you never upgrade to a Pro account, you can do almost everything up to a certain limit using a Free account.
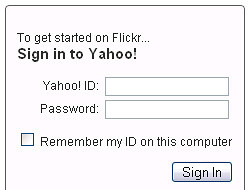
Here’s how you can sign up to Flickr:

See Also: Flickr Tutorial Series
Flickr (pronounced Flicker) is a site that lets you store and share photos. Plus, it also lets you backup and organize your photographs. I first started using Flickr in 2005, and have been using it all these years. So I do understand what you would want to know if you are starting with Flickr.
Having said so, don’t worry if you are new. After so many years, there’s so much that I still need to discover about Flickr! If you have a favorite tip, please do mention it in the Comments section so that together, we can help others get more from their Flickr accounts.
Flickr does so much; let us look briefly at what you can expect if you are new or are just starting with Flickr (see Figure 1).
Filed Under:
F
Tagged as: Flickr, Starting with Flickr
Microsoft and the Office logo are trademarks or registered trademarks of Microsoft Corporation in the United States and/or other countries.